Introduction
OpenClaw is a self-hosted gateway that connects your favorite chat apps — Telegram, WhatsApp, Discord, iMessage, and more — to AI coding agents. It runs locally on your machine, keeping your data under your control while giving you the flexibility to interact with AI assistants from anywhere.
In this post, we’ll walk through how to configure OpenClaw to use a model deployed on Azure AI Foundry as its backend.
If you haven’t already deployed a model on Azure, follow the steps in my previous post: Deploying Kimi K2.5 on Azure.
Prerequisites
Before proceeding, make sure you have:
-
(Optional) An Azure VM to run OpenClaw on — see this gist for Azure CLI commands to create one
-
OpenClaw installed (Installation guide)
curl -fsSL https://openclaw.ai/install.sh | bash -s -- --no-onboard -
A model deployed on Azure AI Foundry — see Deploying Kimi K2.5 on Azure for a step-by-step walkthrough
-
Your Azure API key and deployment domain from the Azure deployment
-
A Telegram bot token (if you want Telegram integration)
Setting Up Environment Variables
First, set the environment variables from your Azure deployment. If you followed the previous guide, you should already have these:
export AZURE_DEPLOYMENT_DOMAIN="<your-custom-domain>"
export AZURE_API_KEY="<your-azure-api-key>"
export AZURE_DEPLOYMENT_NAME="<your-deployment-name>"
export MODEL_NAME="<your-model-name>"
Telegram Integration Variables
Telegram is the easiest channel to set up because it has a mature bot ecosystem. You can create a bot in minutes and configure it so that only you can interact with it. Follow the OpenClaw Telegram channel guide to create your bot and obtain the bot token.
To get your numeric Telegram user ID, see the Appendix at the end of this post.
Once you have both values, set them as environment variables:
export TELEGRAM_BOT_TOKEN="<your-telegram-bot-token>" # Format is 1234567890:ABCdefGHIjklMNOpqrSTUvwxYZ1234567890
export TELEGRAM_USER_ID="<your-telegram-user-id>"     # Format is a numeric ID, e.g., 12345678
Generating the OpenClaw Configuration
OpenClaw reads its configuration from ~/.openclaw/openclaw.json. The following script generates this file with all the necessary settings to connect OpenClaw to your Azure-deployed model. The configuration below also includes a secondary GPT-5 Mini deployment as a fallback — see this gist for the Azure CLI commands used to deploy it.
export WORKSPACE_DIR="/home/${USER}"
cat <<EOF > /tmp/models.json
{
  "models": {
    "providers": {
      "azure-openai-responses": {
        "baseUrl": "https://${AZURE_DEPLOYMENT_DOMAIN}.services.ai.azure.com/models",
        "apiKey": "${AZURE_API_KEY}",
        "api": "openai-completions",
        "authHeader": false,
        "headers": {
          "api-key": "${AZURE_API_KEY}"
        },
        "models": [
          {
            "id": "${AZURE_DEPLOYMENT_NAME}",
            "name": "${MODEL_NAME} (Azure)",
            "reasoning": false,
            "input": ["text"],
            "cost": {
              "input": 0.6,
              "output": 2.5,
              "cacheRead": 0.6,
              "cacheWrite": 0.6
            },
            "contextWindow": 262144,
            "maxTokens": 128000,
            "compat": { "supportsStore": false }
          },
          {
            "id": "gpt-5-mini-deployment",
            "name": "GPT-5 Mini (Azure)",
            "reasoning": false,
            "input": [
              "text",
              "image"
            ],
            "cost": {
              "input": 0.25,
              "output": 2,
              "cacheRead": 0.025,
              "cacheWrite": 0.25
            },
            "contextWindow": 256000,
            "maxTokens": 64000,
            "compat": {
              "supportsStore": false
            }
          }
        ]
      }
    }
  },
  "agents": {
    "defaults": {
      "workspace": "${WORKSPACE_DIR}/.openclaw/workspace",
      "model": {
        "primary": "azure-openai-responses/${AZURE_DEPLOYMENT_NAME}",
        "fallbacks": [
          "azure-openai-responses/gpt-5-mini-deployment"
        ]
      },
      "models": {
        "azure-openai-responses/${AZURE_DEPLOYMENT_NAME}": {},
        "azure-openai-responses/gpt-5-mini-deployment": {}
      }
    }
  },
  "channels": {
    "telegram": {
      "enabled": true,
      "dmPolicy": "pairing",
      "botToken": "${TELEGRAM_BOT_TOKEN}",
      "allowFrom": [
        "${TELEGRAM_USER_ID}"
      ],
      "groupPolicy": "allowlist",
      "streamMode": "partial"
    }
  },
  "browser": {
    "executablePath": "/usr/bin/brave-browser",
    "defaultProfile": "openclaw"
  },
  "gateway": {
    "port": 18789,
    "mode": "local",
    "bind": "loopback",
    "auth": {
      "mode": "token"
    }
  }
}
EOF
Note: On macOS, change
WORKSPACE_DIRto/Users/${USER}and update thebrowser.executablePathto match your browser’s location.
Security note: This script writes your API key into the generated config file. Treat
~/.openclaw/openclaw.jsonas a secret and lock down permissions.
Let’s break down the key sections of this configuration.
Models Configuration
The models.providers section defines how OpenClaw connects to your Azure-deployed model:
baseUrl: Points to your Azure AI Foundry endpoint.api: Set toopenai-completionssince Azure AI Foundry models expose an OpenAI-compatible API.authHeader: Set tofalsebecause Azure uses a customapi-keyheader instead of the standardAuthorization: Bearerheader.headers: Passes the API key via Azure’s expectedapi-keyheader.input: Declares the input modalities the model supports. Setting it to["text"]means the model accepts text-only input. If the model also supports images, you would use["text", "image"].cost: Token pricing for tracking usage costs (values are per million tokens).contextWindowandmaxTokens: Define the model’s context and output limits. These values must be compatible with the--sku-capacityyou set when creating the Azure deployment (viaaz cognitiveservices account deployment create). The SKU capacity defines your provisioned throughput in thousands of tokens per minute — so if you only provisioned 20k tokens per minute but setcontextWindowto 256,000 andmaxTokensto 64,000, requests that exceed your provisioned throughput will fail. Either increase your SKU capacity to match these limits or lower these values to stay within your quota.
Agents Configuration
The agents.defaults section configures the default behavior for OpenClaw agents:
workspace: The directory where agents store their working files.model.primary: Specifies which model to use by default, in the formatprovider/deployment-name.model.fallbacks: A list of backup models that OpenClaw will try if the primary model is unavailable (e.g., due to rate limiting, quota exhaustion, or an outage). In the example above, GPT-5 Mini is configured as a fallback — if the primary Kimi K2.5 deployment fails, OpenClaw will automatically retry the request against GPT-5 Mini without any interruption to your conversation.models: Lists all models the agent is allowed to use. Every model referenced inprimaryorfallbacksmust also have an entry here.
Channels Configuration
The channels.telegram section sets up the Telegram integration:
dmPolicy: "pairing": Each user gets a dedicated agent session. With this setting the first time you DM your bot, OpenClaw will require you to approve the pairing code.allowFrom: Restricts access to only your Telegram user ID, preventing unauthorized usage.groupPolicy: "allowlist": Only whitelisted groups can interact with the bot.streamMode: "partial": Sends partial responses as they’re generated for a more interactive experience.
Browser Configuration
The browser section configures a browser instance that agents can use for web browsing tasks. Adjust the executablePath to match your system.
Deploying the Configuration
Once the config file is generated at /tmp/models.json, copy it to OpenClaw’s config directory:
mkdir -p ~/.openclaw
mv /tmp/models.json ~/.openclaw/openclaw.json
chmod 600 ~/.openclaw/openclaw.json
Then start OpenClaw:
openclaw doctor --generate-gateway-token --yes
openclaw gateway start
Accessing the OpenClaw Dashboard
Once OpenClaw is running, you can monitor and interact with your agents through two interfaces: the web dashboard and the terminal UI (TUI).
Web Dashboard
Run the following command in dashboard and navigate to the Dashboard URL in your browser:
openclaw dashboard
The URL already has the token, but if you see you are not connected, you can retrieve the token with:
cat ~/.openclaw/openclaw.json | jq -r '.gateway.auth.token'
Paste the token into the input field named Gateway Token at http://127.0.0.1:18789/overview and click the Connect button.
Now you’ll then have access to the dashboard where you can view active sessions, monitor agent activity, and manage your channels.
Note: If you’re running OpenClaw on an Azure VM, the dashboard won’t be directly accessible from your local machine. Set up an SSH port forward to access it locally:
ssh -i "${SSH_PRIV_KEY}" -L 18789:127.0.0.1:18789 "${USER_NAME}@${fqdn}"Then open http://127.0.0.1:18789/overview in your local browser.
Terminal UI
If you prefer staying in the terminal, OpenClaw also ships with a TUI:
openclaw tui
If prompted for a token, use the same token from the command above.
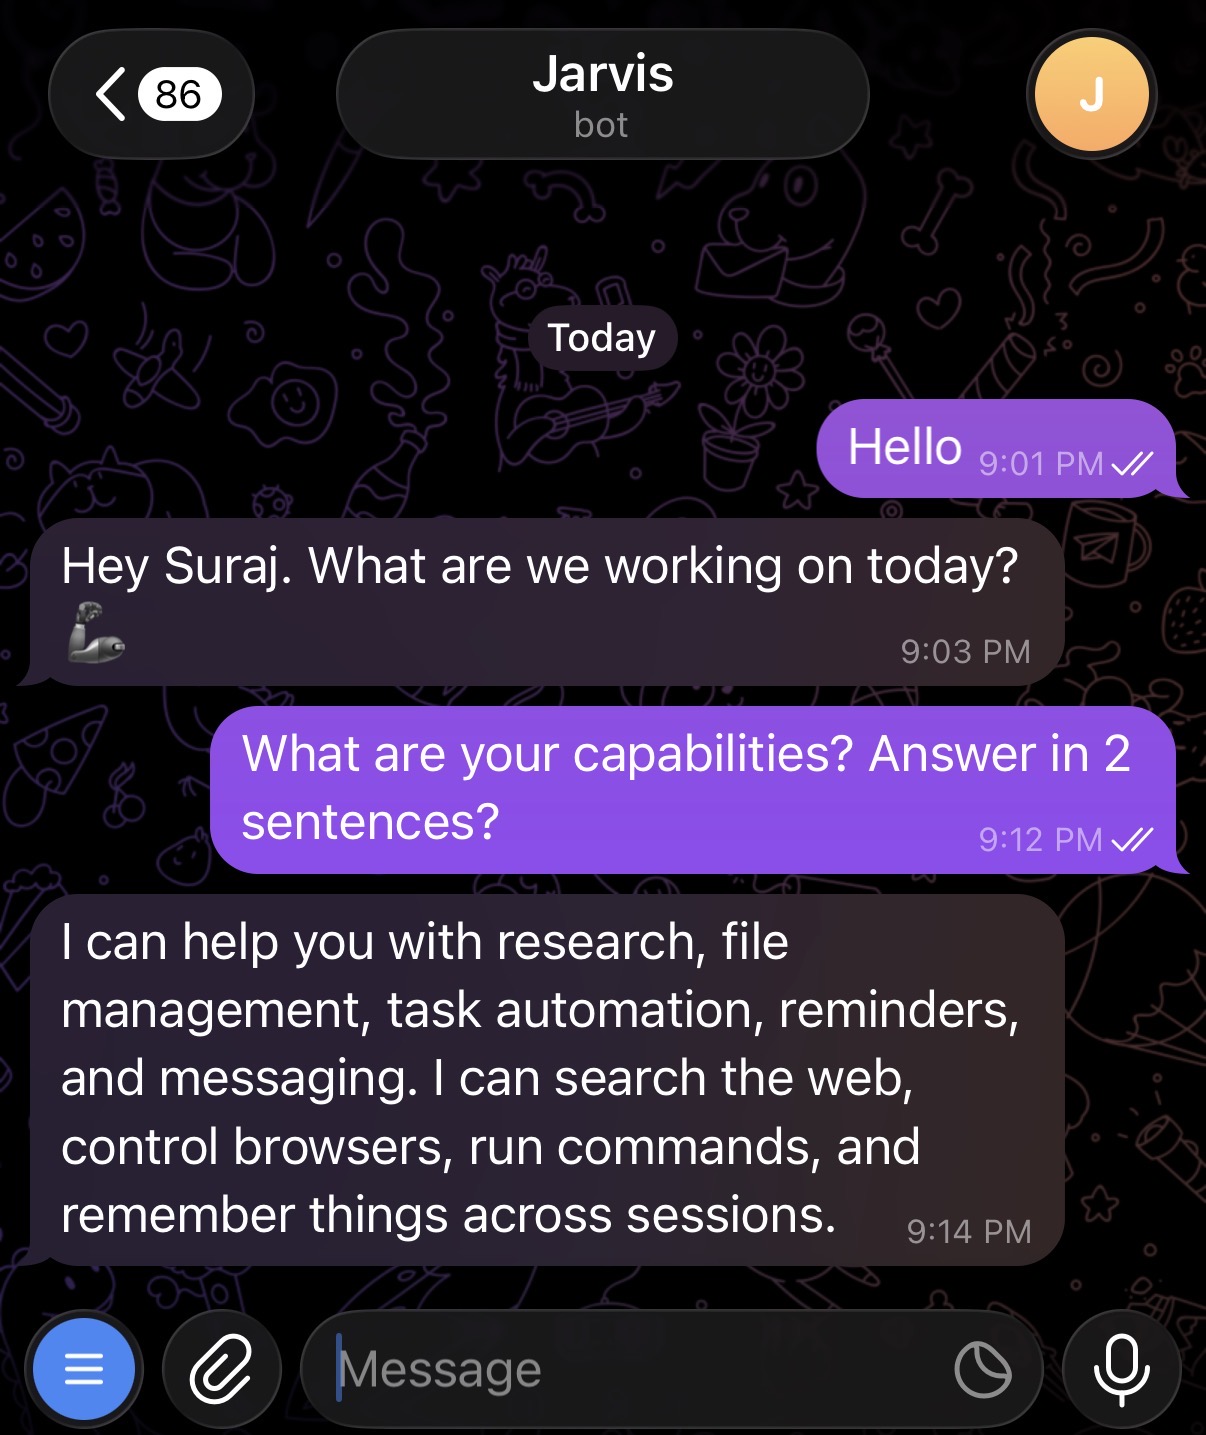
Telegram
Now, open Telegram and start a conversation with your bot:
Viewing Logs
On Linux, OpenClaw typically runs as a systemd service. To tail the logs in real time, run:
openclaw logs --follow
Or on Linux, use journalctl directly:
journalctl --user -f -u openclaw-gateway
Restarting the Gateway
If you’ve updated the configuration or need to restart OpenClaw for any reason, run:
openclaw gateway restart
On Linux, you can also use systemctl directly:
systemctl --user restart openclaw-gateway
Conclusion
With this setup, you have a self-hosted AI assistant powered by Azure AI Foundry, accessible from Telegram (or any other supported chat platform). Since OpenClaw runs on your machine, your data stays with you while you get the convenience of chatting with a powerful AI model from anywhere.
For deploying the underlying model on Azure, refer to the companion post: Deploying Kimi K2.5 on Azure.
Resources
- OpenClaw documentation
- OpenClaw Telegram channel guide
- GPT-5 Mini Azure deployment gist
- Creating an Azure VM for OpenClaw
- Deploying Kimi K2.5 on Azure (companion post)
Appendix: Getting Your Telegram User ID
OpenClaw uses your numeric Telegram user ID in the allowFrom field to restrict bot access to only you. You can also follow the OpenClaw Telegram docs for an alternative method. Here’s one way to find it:
- Open Telegram.
- Search for
@userinfobot(or@getidsbot). - Click Start or type
/startto activate the bot. - The bot will reply with your details. Look for the Id line (e.g.,
12345678). - Copy this number and use it as the value for
TELEGRAM_USER_ID.